Thursday, August 26, 2010
Tuesday, August 17, 2010
Sharepoint 2010 Resources
Collation of materials on Sharepoint 2010
Web Content Management
Routing
http://www.microsoft.com/downloads/details.aspx?displaylang=en&FamilyID=ed922306-0d35-4764-8c2c-a378b54e90e1Environment Setup
Authentication Guidehttp://technet.microsoft.com/en-us/library/ee731989(office.14).aspx
Operational Guide
http://technet.microsoft.com/en-us/library/cc262289(office.14).aspx
Deployment Guide
http://technet.microsoft.com/en-us/library/cc262957(office.14).aspx
Guideline Links
- Guidance for Building Sharepoint Applications (Microsoft)
- Guidance for Building Sharepoint Applications (Codeplex)
- Code Acceptance Checklist
- Sharepoint Best Practices
- Sharepont Dispose Checker Tool
- Using Disposable Sharepoint Objects
Microsoft Documents
- Capacity and Performance Planning [Pdf]
- Developer and IT Professional Learning Plan [Pdf]
- Sharepoint Developer Platform Wall Poster [Pdf]
- Document Management [Pdf]
- Developer Training Kit [Exe]
Hands on Labs [Pdf]
Source: Microsoft.com- 01 - Building Visual Web Parts – C#
- 02 - Building a List Definition and Event Receiver – C#
- 03 - Advanced Web Part – C#
- 04 - Using Linq To SharePoint - C#
- 05 - Using Client OM and REST from .NET App – C#
- 06 - Developing a BCS External Content Type with Visual Studio 2010 – C#
- 07 - Developing a SharePoint 2010 Workflow with Initiation Form in Visual Studio 2010 – C#
- 08 - Using Silverlight with the Client Object Model – C#
- 09 - Developing SharePoint 2010 Sandboxed Solutions in Visual Studio 2010 – C#
- 10 - Developing SharePoint 2010 User Interface Ribbon and Dialog Customizations – C#
- Hands On Labs Code
Architectural Diagrams
Source: Microsoft.com- Choose a tool for business intelligence in SharePoint 2010 [vsd]
- Business Connectivity Services
- Content Deployment [vsd]
- Hosting Sharepoint Products [vsd]
- Crossfarm Implementation [vsd]
- Single Farm [vsd]
- Sharepoint Topologies [vsd]
- Search Model (1 of 4) [vsd]
- Search Model (2 of 4) [vsd]
- Search Model (3 of 4) [vsd]
- Search Model (4 of 4) [vsd]
- Upgrade Planning
- Upgrade Approaches
- Upgrade Testing
- Upgrade Services
- Extend Web Application
- Plan Authentication
- Logical Architecture Components
Whitepapers
- Content Migration - from Vamosa
- Sharepoint 2010 Overview [source: http://www.understandingsharepoint.com/]
- Plan for Large Libraries
SPC Presentations
Source: Microsoft.com
- Performance Capacity Planning [pptx]
- Managing Digital Assets [pptx]
- Enterprise Content Types [pptx]
- User-Centered Design Techniques [pptx]
- Training Certifications Materials [pptx]
- Storage for SharePoint [ppt]
- Sharepoint Useful Tips [pdf]
- Enterprise Content Management [pptx]
- SharePoint Gotchas [pptx]
- SharePoint 2010 Enterprise Search Deep Dive [pptx]
- SharePoint 2010 Developer Story [pptx]
- SharePoint 2010 - The Big Picture [ppt]
- SharePoint 2010 - Client Integration Features [pptx]
- Record Management in SP 2010 [pptx]
- Geo Replication for SharePoint [pptx]
- EMC - JPMC SharePoint Design Center [pptx]
- CRM SharePoint Integration [ppt]
- Cascading Drop Down Lists [wmv]
- AlvarezMarsal_MOSS Case Study [zip]
- Ajax Auto-Complete [pptx]
- Architecture guidance for building applications in SharePoint 2010 [pptx]
- Sharepoint Development Best Practices [pptx]
- Managing Digital Assets in Sharepoint
- Content Types Video
Term Store
http://technet.microsoft.com/en-us/library/cc263513.aspx
http://technet.microsoft.com/en-us/library/cc263199.aspxhttp://blogs.msdn.com/sharepoint/archive/2007/04/09/investing-in-logical-architecture-design-samples.aspx
Unit Testing
Session state has been disabled for ASP.NET.The Report Viewer control requires that session state be enabled in local mode.
While i was trying to setup some reports on a SPF 2010 site.
After trying to add a Sql Reporting Webpart i get the error:
Session state has been disabled for ASP.NET.
The Report Viewer control requires that session state be enabled in local mode
I never came across that error before when using RSWebaprts in Sharepoint 2007:)
But i think is related to ASP.NET sessions state:(
Any to fix it you would have to start to make sure the SharePoint Server ASP.NET Session State Service is enabled.
Unfortunately in Sharepiint SPF2010 and SP 2010 you would have to do it using PowerShell
By doing : Enable-SPSessionStateService -Defaultprovision
PS C:\> PSSnapin - Shows you all the PS Snapins
PS C:\> Add-PSSnapin "Microsoft.SharePoint.PowerShell" -- Adds the Sharepoint PS Snapin
PS C:\> get-command -Noun SP* -- Show all SP cmdlets
PS C:\> Add-SPShellAdmin -- (If you get error regarding the access to the farm you use this command to add an acct to able to run the Shell admin)
PS C:\> Get-Help Enable-SPSessionStateService - Shows helpp for Enable-SPSessionStateService
PS C:\> Enable-SPSessionStateService -Defaultprovision - (enables/activates SPSessionStateService) you have more options available when you run the Get-Help Enable-SPSessionStateService
The Enable-SPSessionStateService cmdlet creates a session state database, installs the ASP.NET session state schema, and updates the Web.config files on the farm to turn on the session state service.
If the DefaultProvision form of the command is used, all default settings are used. These are:
DatabaseName = “SessionStateService_”
DatabaseServer = the same database server as the SharePoint 2010 configuration database
DatabaseCredentials = Integrated Windows Authentication
After running the cmd you should see the SharePoint Server ASP.NET Session State Service started in your service applications in the Central Admin Site.
And of course be able to add your RS webparts
Enjoy
While i was trying to setup some reports on a SPF 2010 site.
After trying to add a Sql Reporting Webpart i get the error:
Session state has been disabled for ASP.NET.
The Report Viewer control requires that session state be enabled in local mode
I never came across that error before when using RSWebaprts in Sharepoint 2007:)
But i think is related to ASP.NET sessions state:(
Any to fix it you would have to start to make sure the SharePoint Server ASP.NET Session State Service is enabled.
Unfortunately in Sharepiint SPF2010 and SP 2010 you would have to do it using PowerShell
By doing : Enable-SPSessionStateService -Defaultprovision
PS C:\> PSSnapin - Shows you all the PS Snapins
PS C:\> Add-PSSnapin "Microsoft.SharePoint.PowerShell" -- Adds the Sharepoint PS Snapin
PS C:\> get-command -Noun SP* -- Show all SP cmdlets
PS C:\> Add-SPShellAdmin -- (If you get error regarding the access to the farm you use this command to add an acct to able to run the Shell admin)
PS C:\> Get-Help Enable-SPSessionStateService - Shows helpp for Enable-SPSessionStateService
PS C:\> Enable-SPSessionStateService -Defaultprovision - (enables/activates SPSessionStateService) you have more options available when you run the Get-Help Enable-SPSessionStateService
The Enable-SPSessionStateService cmdlet creates a session state database, installs the ASP.NET session state schema, and updates the Web.config files on the farm to turn on the session state service.
If the DefaultProvision form of the command is used, all default settings are used. These are:
DatabaseName = “SessionStateService_
DatabaseServer = the same database server as the SharePoint 2010 configuration database
DatabaseCredentials = Integrated Windows Authentication
After running the cmd you should see the SharePoint Server ASP.NET Session State Service started in your service applications in the Central Admin Site.
And of course be able to add your RS webparts
Enjoy
Tuesday, August 10, 2010
MOSS Web Services – Accessing Sharepoint List data
Sharepoint 2007 provides rich set of API’s that allows developers to develop custom components in Sharepoint to meet custom requirements.
SharePoint API’s can be classified into two types.
Sharepoint Object Model
Sharepoint Web Services
Sharepoint Object Model enables developers to customize almost anything that is in Sharepoint right from creating a Site Collection to connecting to external data sources. This object model is enclosed in 10 dll’s with 30 namespaces. A series of articles on consuming Sharepoint object model can be found here and here.
In on of my previous posts, I wrote down the steps to access SharePoint list data using SharePoint object model and CAML queries.
Now, lets see how to consume the Sharepoint Web Services in order to retrieve the Sharepoint List Data.
Step By Step
Create a new windows form project.
Add Web Reference to Sharepoint Lists Web Service
Right-click ‘Service Reference’ and select ‘Add Service Reference’.
In the Add Service Reference dialog box, click Advanced button.
In the ‘Service Reference settings’ dialog box, click Add Web Reference.
In the Url dropdown box, enter the url of your sharepoint site’s web service. If you are developing in the same system as the system in which MOSS is installed, then you can find the web services by clicking the link ‘Web Services in this Solution’ available in the Add Web Reference dialog box.
Note : The _vti_bin directory present under the sharepoint website directory lists down all the web services available.
Scroll through the list of Web Services. Click in the ‘Lists’ web service. Check the url in the url column and ensure that this Lists web service corresponds to your sharepoint site.
In the Web Reference name text box, give a name to the Lists web reference. Lets name it ListsWS.
Click Add Reference.
Place a button in the form. Name it btnGetListItems and the Caption can be Get List Items. Double click the button and generate the event handler.
The Lists web service contains an class called Lists. Lets create an object for this Lists class.
ListsWS.Lists list = new ListsWS.Lists();
The List object contains a method called GetListItems(). We need to invoke this method with appropriate parameters to get the items from the list
The first parameter to this method is the name of the list.
The remaining parameters are there to filter the list based on user defined criteria’s. Without any criteria, to fetch all the items from the list, the method should look like the following.
list.GetListItems(“MyListName”, “”, null, null, “”, null,null);
The signature of GetListItems in MSDN
The return type of the GetListItems() is an Xml Node.
The XmlNode’s inner xml looks like the following.
We need to process the xml node in order to access the list values.
Below, I have processed the xml to obtain the value of the column ‘Title’ that is present in the list and displayed it in a label.
The entire code is given below
ListWS.Lists lists = new ListWS.Lists();
lists.UseDefaultCredentials = true;
XmlNode nodes = lists.GetListItems(“MyList1″, “”, null, null, “”, null, null);foreach (XmlNode node in nodes)
{
if (node.Name == “rs:data”)
{
for (int i = 0; i < node.ChildNodes.Count; i++)
{
if (node.ChildNodes[i].Name == “z:row”)
{
lblResults.Text = node.ChildNodes[i].Attributes["ows_Title"].Value;
}
}
}
}
Creating Sites using Sharepoint Object Model
MOSS 2007 provides rich set of API’s that allows developers to programatically accomplish almost everything that can be done in sharepoint. Sharepoint Object Model comes with 10 different dll’s comprising 30 namespaces.
The aim of this post is to leverage the sharepoint object model in order to create a new sharepoint site programatically.
Before getting into that, lets look at the sharepoint site structure in the following diagram.
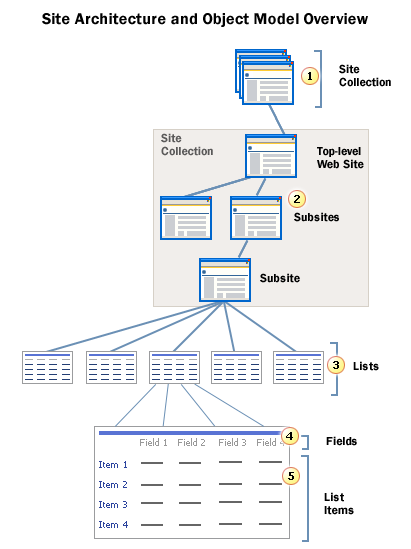
Each layer in the above architecture diagram is represented by an object in the sharepoint object model. The object mapping is represented in the following table.
| Sharepoint Site Architecture Component | Object in Sharepoint Object Model |
| Site Collection | SPSite |
| Site | SPWeb |
| List Collection | SPListCollection |
| List | SPList |
| List Field Collection | SPFieldCollection |
| List Field | SPField |
| List Item Collection | SPListItemCollection |
| List Item | SPListItem |
Steps to create a new Sharepoint Site:
- Open Visual Studio. Create a new Windows Forms project.
- Add a textboxes, one to accept the name of the site collection and another to accept the name of the new site to be created under the site collection.
- Add a button that creates the new site.
- Add reference to Microsoft.Sharepoint dll. This dll is represented by the name Windows Sharepoint Services in the Add Reference dialog box.
- Add the namespace of Microsoft.Sharepoint dll like this.
- using Microsoft.Sharepoint;
- In the button click event, open the site collection.
- SPSite siteCollection = new SPSite(txtSiteCollectionUrl.Text);
- Now open the top level site of the site collection.
- SPWeb site = siteCollection.OpenWeb();
- If you want to open a different site under the site collection other than the top level site, you can use the overloaded methods of the OpenWeb() method that accepts the name of the site as argument.
- SPWeb object has a property called ‘Webs’ that contains a collection of all the sites present under that site.
- Inorder to add a new site, use the following code.
- site.Webs.Add(txtSiteName.Text, txtSiteName.Text, Convert.ToUInt32(1033),site.WebTemplate, , false,false);
- Close and dispose and the site and site collection
- site.dispose();
- siteCollection.close();
The complete code can be found in this file.using System;
using System.Collections.Generic;
using System.ComponentModel;
using System.Data;
using System.Drawing;
using System.Linq;
using System.Text;
using System.Windows.Forms;
using Microsoft.SharePoint;
using System.Collections.Generic;
using System.ComponentModel;
using System.Data;
using System.Drawing;
using System.Linq;
using System.Text;
using System.Windows.Forms;
using Microsoft.SharePoint;
namespace WindowsFormsApplication1
{
public partial class Form1 : Form
{
public Form1()
{
InitializeComponent();
}
{
public partial class Form1 : Form
{
public Form1()
{
InitializeComponent();
}
SPSite siteCollection;
SPWeb site;
SPWeb site;
private void btnCreateSite_Click(object sender, EventArgs e)
{
{
try
{
siteCollection = new SPSite(txtSiteCollection.Text);
site = siteCollection.OpenWeb();
site.Webs.Add(txtSiteName.Text, txtSiteName.Text,
txtSiteName.Text + ” Desc”, Convert.ToUInt32(1033), site.WebTemplate,
false, false);
}
catch (Exception)
{ }
finally
{
site.Dispose();
siteCollection.Close();
}
}
{
siteCollection = new SPSite(txtSiteCollection.Text);
site = siteCollection.OpenWeb();
site.Webs.Add(txtSiteName.Text, txtSiteName.Text,
txtSiteName.Text + ” Desc”, Convert.ToUInt32(1033), site.WebTemplate,
false, false);
}
catch (Exception)
{ }
finally
{
site.Dispose();
siteCollection.Close();
}
}
}
}
}
Sample code to Create a Custom List Using Object Model in Sharepoint 2007
Listed below are the Sharepoint site components and their corresponding object in the sharepoint object model.
| Sharepoint Site Architecture Component | Object in Sharepoint Object Model |
| Site Collection | SPSite |
| Site | SPWeb |
| List Collection | SPListCollection |
| List | SPList |
| List Field Collection | SPFieldCollection |
| List Field | SPField |
| List Item Collection | SPListItemCollection |
| List Item | SPListItem |
Steps to create a new Sharepoint List:
- Open Visual Studio. Create a new Windows Forms project.
- Add a textboxes, one to accept the name of the site collection and another to accept the name of the new site to be created under the site collection.
- Add a button that creates the new site.
- Add reference to Microsoft.Sharepoint dll. This dll is represented by the name Windows Sharepoint Services in the Add Reference dialog box.
- Add the namespace of Microsoft.Sharepoint dll like this.
- using Microsoft.Sharepoint;
- In the button click event, open the site collection.
- SPSite siteCollection = new SPSite(txtSiteCollectionUrl.Text);
- Now open the top level site of the site collection.
- SPWeb site = siteCollection.OpenWeb();
- If you want to open a different site under the site collection other than the top level site, you can use the overloaded methods of the OpenWeb() method that accepts the name of the site as argument.
- The Lists property present in the SPWeb object will return all the lists that are present in that site as an SPListCollection object
- SPListCollection listCollection = site.Lists;
- In order to add a new list, use the add method of the SPListCollection object.
- listCollection.Add(“listname”, “list description”, SPListTemplateType.GenericList);
- Note that the third argument accepts the template in which the list should be created. GenericTemplate represents the custom list. We can choose the template we need from the SPListTemplateType enum.
- Close and dispose and the site and site collection
- site.dispose();
- siteCollection.close();
The complete code can be found below..
using System;
using System.Collections.Generic;
using System.ComponentModel;
using System.Data;
using System.Drawing;
using System.Linq;
using System.Text;
using System.Windows.Forms;
using Microsoft.SharePoint;
using System.ComponentModel;
using System.Data;
using System.Drawing;
using System.Linq;
using System.Text;
using System.Windows.Forms;
using Microsoft.SharePoint;
namespace WindowsFormsApplication1
{
public partial class Form1 : Form
{
public Form1()
{
InitializeComponent();
}
{
public partial class Form1 : Form
{
public Form1()
{
InitializeComponent();
}
SPSite siteCollection;
SPWeb site;
SPWeb site;
private void btnCreateSite_Click(object sender, EventArgs e)
{
{
try
{
siteCollection = new SPSite(txtSiteCollection.Text);
site = siteCollection.OpenWeb();
SPListCollection listCollection = site.Lists;
{
siteCollection = new SPSite(txtSiteCollection.Text);
site = siteCollection.OpenWeb();
SPListCollection listCollection = site.Lists;
listCollection.Add(txtListName.Text, “list description”, SPListTemplateType.GenericList);
}
catch (Exception)
{ }
finally
{
site.Dispose();
siteCollection.Close();
}
}
}
catch (Exception)
{ }
finally
{
site.Dispose();
siteCollection.Close();
}
}
}
}
}
Monday, August 9, 2010
First Look at SharePoint 2010 BCS – Business Connectivity Services
Business Connectivity Services (BCS) is a new service introduced with SharePoint 2010 to allow SharePoint sites to connect to and manipulate external data. SharePoint 2007 had a similar facility in the form of Business Data Catalog (BDC) which made external data available within its site. However, a major problem with BCS was the difficulty in creating solutions as there was no support in the 2007 designer. Most BDC solutions were simply for accessing external data, manipulating external data sources was extremely difficult.
With SharePoint 2010, BCS ships with out-of-box features such as solutions, services, and tools which may connecting to external data an easy task. Whether you want to retrieve Outlook contacts in a list offline or edit the contents of your document file or share your excel sheet online or reuse data from dynamic InfoPath forms or just update your business presentation, BCS enables deep content sharing, editing and integration in SharePoint 2010 with SharePoint Designer and Visual Studio tools.
BCS Architecture
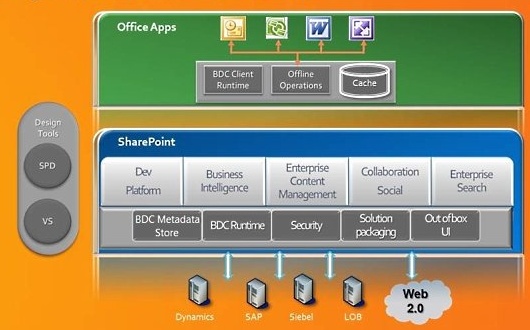
- BDC Metadata Store – As a part of services layer, BDC Metadata store is a database for external content types that form the fundamental blocks of BCS.
- BDC Server Runtime - BDC Server runtime is an intelligent set of services to access the backend storage and connect to the data based on the defined external content type.
- Security - Secure Store Service (SSS) is integrated to ensure security.
- Solution Packaging -Visual Studio Tools for Office (VSTO) packaging for clients such as Word, Outlook, InfoPath is possible.
- Out of Box UI - Displaying external data with the integration of Web Part’s UI will ensure deeper integration of external lists.
- BDC Client Runtime - The BDC Client Runtime enables offline operations with client-side caching and then reflecting the changes on the server when the client is online.
- Design Tools - SharePoint Designer and Visual Studio – SharePoint Designer helps in creating rich BCS solutions for managing external content types and lists, whilst Visual Studio is suitable for developing advanced solutions with custom code.You can create an external content type using either SharePoint Designer 2010 or Visual Studio.
External content types
Before we integrate external data, we need to create an external content type. You can use the SharePoint site or SharePoint designer to create an external content type. In this example, we will use SharePoint Designer 2010.
Navigate to the External Content Type option in SharePoint Designer 2010.
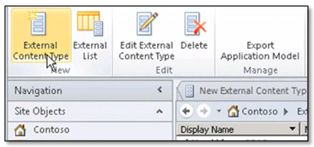

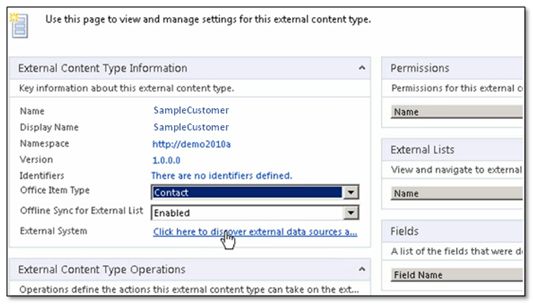
The External Content Type dialog will be displayed. Enter the Name and Display Name for the external content type. Then, under the External Content Type Information section, select the Office Item Type as Contact from the dropdown list.
Next click the link, Click here to discover external data sources and define operationsto integrate the existing customer database.

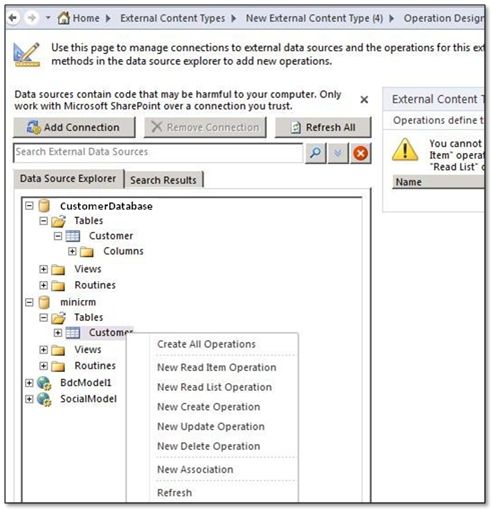
The Operation Designer dialog will then be displayed. Click Add a Connection to connect to the database. Once the connection is established, the database table will be displayed. Right click the table and select the option, Create All Operations so that you will be able to read, select, update and delete rows from the database table.

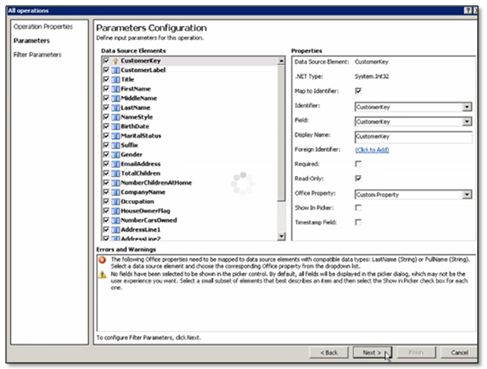
Then in the operation wizard map, select the key data source elements such as first name, last name, phone number etc., to map to the respective office properties. Close the operation wizard when finished.

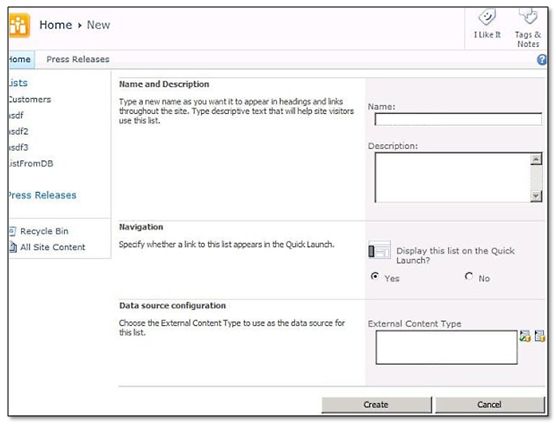
The external data type is now created and you can create a new external list from the SharePoint 2010 dashboard. Navigate to Site Actions and view all site content. SelectExternal List and then click Create . Enter the name of the new list and select the external content type from the list and finally click Create . The new external list behaves as any other ordinary list.

Subscribe to:
Posts (Atom)
