Monday, August 9, 2010

Building Approval Workflows with SharePoint Server 2010


Workflows (sequences of connected steps) are an everyday occurrence in most offices and as such, SharePoint 2010 provides support for workflows. In this article we review how to add an approval workflow to a SharePoint Document Library.
The approval workflow is one of the few built-in workflows that come with the SharePoint 2010. Basically it allows you to receive an approval for a document from your superiors.
If you need a custom workflow you can create your own with SharePoint Designer or Microsoft Visio and import it into SharePoint Designer or program it inside Microsoft Visual Studio. How to do this is outside of the scope of the current article.
The sample workflow we are going to build will be triggered upon uploading a new document to a custom document library. Then the workflow will assign a task to a predefined user to approve the uploaded document. The status of the document – approved/rejected will be displayed in one of the columns of the library. And we will do everything without writing a single line of code!
The first step is  to create the Document library where the approval workflow will be enabled. To do this, select the “Site Actions” menu and then choose “New Document Library” as shown in Figure 1.
moz screenshot Building Approval Workflows with SharePoint Server 2010
Create New Document Library - Site Actions menu
Figure 1 Create New Document Library – Site Actions menu
Next, the dialog for creating a new Document library will appear (Figure 2). Fill in “Purchase Requests” for the “Name” of the new library and optionally provide description. Select the options for “Navigation” and “Document Version History” – whatever fits to your requirements is fine as they are irrelevant to our example. For “Document template”,  select “Microsoft Word document”. You can choose whatever you wish but this current example we will use Word documents.
Create New Document Library
Figure 2 Create New Document Library
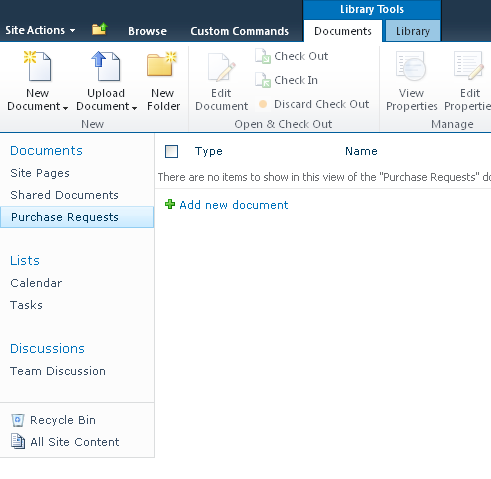
After you have filled in everything, click Create and the new document library will be created as shown in  Figure 3
Purchase Request Library is created
Figure 3 Purchase Request Library is created
Now it is time to enable the Approval workflow for our newly created library. To do so select “Library” from the “Library tools” and then select “Workflow Settings” as displayed in Figure 4.
Workflow Settings button
Figure 4 Workflow Settings button
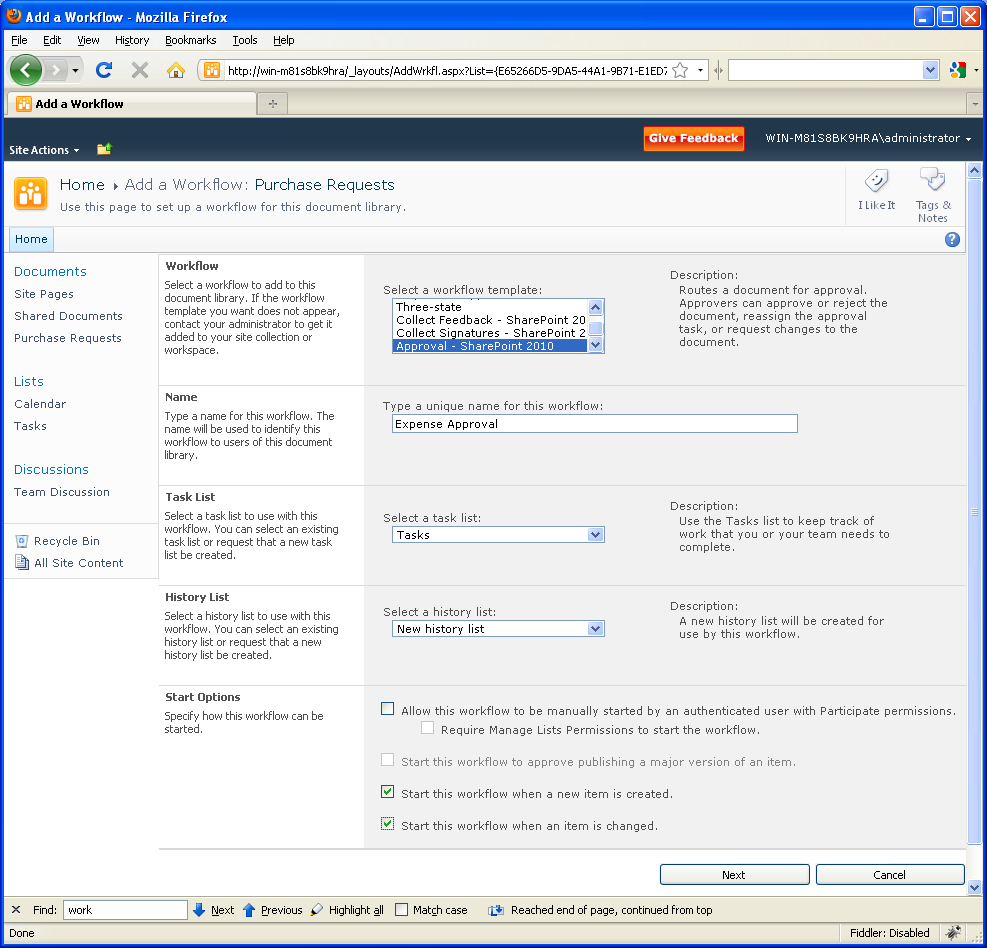
This will start the wizard shown in Figure 5 which will help you to enable the approval workflow for the current document library. The first thing to do is select the workflow template from the list box in the “Workflow” section. You can choose from several out-of-the-box workflow templates but we will choose “Approval – SharePoint 2010”. Then we provide a name for our workflow:  “Expense approval”. The task list drop down  allows us to define a list where a new task will be assigned to the corresponding user. Let’s use the default value – “Tasks”. Later we will configure the users responsible for approving the documents. Next, we define the history list for the workflow. History lists are special logs which monitor the execution of the workflow. At each step of the workflow, messages at written to the log upon execution of the step. Again, accept the default value, as shown in Figure 5. Now, configure how the workflow is started. Generally, two approaches are possible -  manual and automatic. We will use the latter and will deselect the check boxes for manual starting and we will select the checkboxes for automatic starting.
After pressing the next button, we will navigate to the second step of the configuration wizard – Figure 6.
Add workflow – Step 1
Figure 5 Add workflow – Step 1
Add workflow – Step 2
Figure 6 Add Workflow – Step 2
Now, we need to configure the users responsible for approving the content (Word files in this case). We will do it by clicking the ‘open book’ icon and select it from a list. In our example the approver will be John. You can also specify user groups, not just single users. If there are multiple users selected, you can choose to approve one at a time or all at a time.
We also need to specify a Notification message. This message will be used to remind the user assigned as an approver, the action he is supposed to take. Something like “Please approve” will be appropriate in this case.
The other fields are not necessary to complete the workflow. If you are curious about these, you can read the detailed explanation below each field.
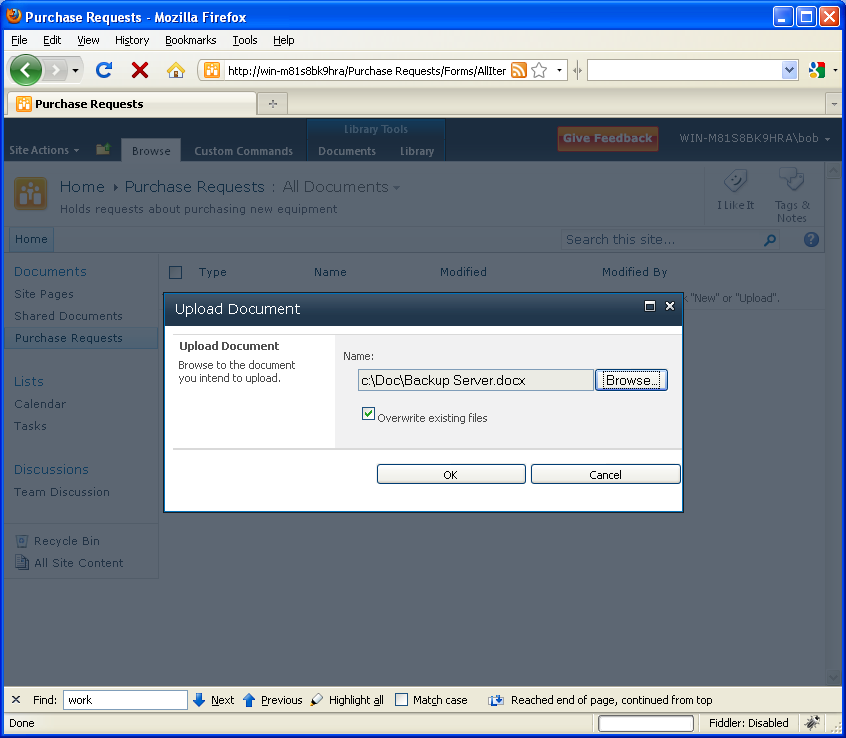
After pressing the Save button our workflow is ready and it is time to see how it works. To do this, we will upload a new Word document to the document library we have created earlier. Navigate to the “Purchase Requests” via the menu on the left and select “Add new document”. A new popup dialog will appear (Figure 7) where we can select a Microsoft Word document from the local hard drive. Click OK and a popup dialog will appear, where additional properties can be assigned to the newly uploaded file. For example,  you can associate some keywords with it.
Upload Document
Figure 7 Upload Document
As you can see from Figure 8 our file has been uploaded to the document library and the last column shows that the Expense approval workflow is in progress. This means that a new task has been assigned to John (the user we specified early as an approver). If we open the Tasks List (Figure 9), we will note that there is a new task with the title “Please approve Backup Server” assigned to John. If SharePoint is configured to use the SMTP server, John will receive an email that informs him of the new task.
Newly uploaded document has started the workflow
Figure 8 Newly uploaded document that has started the workflow
Approval Task Assigned to John
Figure 9 Approval Task Assigned to John
Now, let’s suppose we have logged in as John. After opening the “Please approve the Backup Server” task a new popup window will appear – Figure 10. We can approve or reject the document by clicking Approve/Reject . In addition, we have the option to assign the task for approving the document to another user. For this demo we will approve the document by clicking Approve.
Document Approval Dialog
Figure 10 Document Approval Dialog
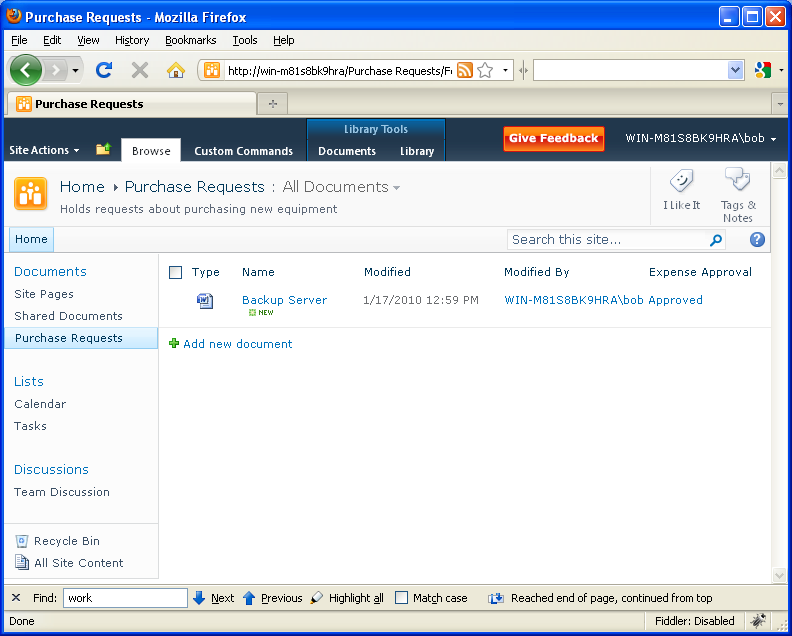
Now, after John has approved our document, we can go back to the “Purchase Requests” document library and check the status of our document. You will notice that the last column now shows “Approved”.
Document is approved
Figure 11 Document is approved
In this article we have reviewed how to configure an approval workflow for a custom document library. The workflow was started automatically after a new document was uploaded. If you need a more sophisticated workflow, you will need to use the SharePoint Designer or Visual Studio to create one. The last approach is far more complicated and requires programming skills.

Migrate MOSS 2007 to SharePoint Server 2010.


Microsoft recently released SharePoint Server 2010. Microsoft claims that migrating from SharePoint 2007 to 2010 is a easy and straightforward, however, I remember when migrating from SharePoint 2003 to 2007 the process was painful and difficult and there were several  incompatible elements that had to be dealt with. So I approached the migration to Sharepoint 2010 from MOSS 2007.
The sample intranet site presented in this article is hosted on Windows Server 2008 R2 64-bit (which is required for SharePoint 2010) with SQL 2008R2 Express 64-bit.
First, let’s look at the SharePoint 2007 site we migrate. For this demonstration I created a simple MOSS 2007 Enterprise environment based on the Collaboration template, which contains some generic web parts we’ll test on SharePoint 2010, Document Center and Search Center. I setup and double checked the search, because I wonder if the migrated SharePoint would be able to use the search database crawled in the previous, 2007 version of SharePoint. Search is an important issue for migrating Sharepoint installations with large amount of data where a full crawl of the content may take weeks.
image001 Migrate MOSS 2007 to SharePoint Server 2010.
My Intranet Site in MOSS 2007
Now, install SharePoint Server 2010 right on the existing installation. In the Setup window, we can view the server requirements, installation guide etc. We will skip this part and proceed straight to the Installation.
image002 Migrate MOSS 2007 to SharePoint Server 2010.
SharePoint Server 2010 installation screen
First we need to install software prerequisites. We may already have all required components since we are already running MOSS 2007, but to be sure, we’ll go select this option.
The preparation tool window that launches checks our server for the required components, and installs them if needed. The components that will be updated are:
  • Application Server Role and IIS Role
  • SQL Server 2008 Native Client
  • Microsoft “Geneva” Framework Runtime
  • Microsoft Sync Framework Runtime v1.0
  • Microsoft Chart Controls for Microsoft .NET Framework 3.5
  • Microsoft Filter Pack 2.0
  • Microsoft SQL Server 2008 Analysis Services ADOMD.NET
Let’s open the preparation tool. After reading the short tool description and accepting the terms, the preparation tool will start updating the server immediately.
image003 Migrate MOSS 2007 to SharePoint Server 2010.
SharePoint Server 2010 Preparation Tool
After succesfull configuration, the summary screen will be displayed and the tool will likely request a  reboot of the system.
image004 Migrate MOSS 2007 to SharePoint Server 2010.
Preparation Tool Summary Screen
When Finish button is clicked the system will reboot automatically. After the reboot, the Preparation Tool launches again and finishes the rest of the steps. Now our system is ready to install SharePoint Server 2010, so select that option from the setup pane.
We will be prompted to enter the license key (which is necessary even when Sharepoint 2010 is in Beta):
image005 Migrate MOSS 2007 to SharePoint Server 2010.
Product Key window in SharePoint Server 2010 Setup
After the key we have to read and accept licence terms. Next screen advise that MOSS 2007 was detected.
image006 Migrate MOSS 2007 to SharePoint Server 2010.
SharePoint Server 2010 Setup Screen – Upgrade Window
As advised in the above screen we need to run the stsadm command now to ensure our intranet can be successfully migrated. Open cmd.exe console in administrator mode.
image007 Migrate MOSS 2007 to SharePoint Server 2010.
Start – Cmd.exe in Administrator mode.
Navigate to the MOSS 2007 Bin Directory, which is located by default at C:\Program Files\Common Files\Microsoft Shared\Web Server Extensions\12\bin directory.
image008 Migrate MOSS 2007 to SharePoint Server 2010.
Cmd Window in the MOSS 2007 bin folder.
Enter stsadm -o preupgradecheck. This command does  not perform any repairs, but \only checks for and reports issues with possible solutions to apply before the migration. As the command executes we will see the output continuously displayed on the screen with different status notifications. In this check, some notifications were “Aborted due to internal error”. We will ignore this for now as the overall check was succesfull.
image009 Migrate MOSS 2007 to SharePoint Server 2010.
stsadm preupgradecheck output.
The browser will then open  to display the  html document with the summary of the output and details of every issue. As all components passed the test  we are ready for the migration.
Go back to our SharePoint Server 2010 Setup window and click the Install Now button.
After the installation, we’ll see the final screen where we are informed that we must launch the SharePoint configuration wizard in order to update our content to latest SharePoint version.
image010 Migrate MOSS 2007 to SharePoint Server 2010.
SharePoint Server 2010 Installation Summary screen
Click Close to run SharePoint Configuration wizard. If you were expecting a wizard similar to the SharePoint 2007 wizard, you will be disappointed . We have now entirely new environment for Sharepoint 2010 version and hence a new Configuration Wizard.
image011 Migrate MOSS 2007 to SharePoint Server 2010.
SharePoint 2010 Configuration Wizard
Click Next, and the below warning will be shown:
image012 Migrate MOSS 2007 to SharePoint Server 2010.
Warning Window in SharePoint 2010 Configuration Wizard
Click Yes and we will see a new feature of Sharepoint 2010  -  Farm Passphrase.
image013 Migrate MOSS 2007 to SharePoint Server 2010.
Farm Security Settings Window
The Farm Passphrase will prevent server administrators from changing any data in  our SharePoint 2010 installation when no password is provided. Administrations won’t be able to use content or configuration databases even if  full database backups are obtained. Enter a password and continue with the configuration.
The next step is the Visual Upgrade.
image014 Migrate MOSS 2007 to SharePoint Server 2010.
Visual Upgrade Window

Sharepoint